
Recording
Camera Graph records its output straight to a movie file: the live scene with every layer, filter and transition, at your output size and frame rate. You don’t need QuickTime or a screen recorder.
Record
Section titled “Record”
- Click the Record button in the toolbar, choose Control › Start Recording, or press ⌘R.
- The first time, Camera Graph asks for a folder to save recordings in. Choose one and click Open.
- A REC badge with a timer appears above the preview, and the Record button turns red with a stop symbol.
- To stop, click the button again, choose Control › Stop Recording, or press ⌘R.
When the file is saved, its name appears above the preview as a link. Click it to show the file in the Finder. The link stays until you start the next recording.
You can also stop a recording from the menu bar panel.
Record settings
Section titled “Record settings”Click the arrow next to the Record button to open Record settings. You can’t change them while a recording is running.
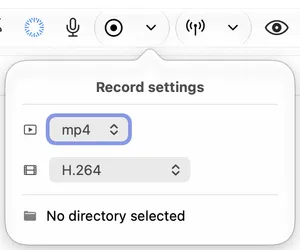
| Setting | Options | Default |
|---|---|---|
| File Type | mov, mp4. ProRes 422 always records to mov. | mp4 |
| File Format | ProRes 422, HEVC (H.265), H.264 | H.264 |
| Save Directory | The folder recordings go in. Click it to choose another. | None (“No directory selected”); asked for at your first recording |
Which format to use
Section titled “Which format to use”| Format | Use it when | Notes |
|---|---|---|
| H.264 | You want a file that plays and uploads anywhere. | The default. |
| HEVC (H.265) | You want smaller files at the same quality, or you record 4K. | Plays on current Macs and iPhones and in most editors. |
| ProRes 422 | You’ll edit the footage and want the most quality, or you record above 60 fps. | Very large files. Always saved as mov: choosing ProRes 422 sets File Type to mov. |
Above 60 fps, ProRes 422 in a mov file is the only choice. When you set the frame rate to 120, Camera Graph switches the format to ProRes 422 for you.
Instant Replay isn’t available while the format is ProRes 422.
Size and frame rate
Section titled “Size and frame rate”A recording is the same size and frame rate as your output. Set both in Settings › Video, or click the frame rate or resolution in the toolbar to go there.
| Setting | Options | Default |
|---|---|---|
| Stream Resolution | 3840x2160, 2560x1440, 1920x1080, 1080x1920, 1280x720, 720x1280, 854x480, or Custom Resolution | 1920x1080 |
| Frames Per Second | 24, 30, 48, 60, 120 | 30 |
For a portrait video for Reels, Shorts or TikTok, choose 1080x1920. See Record Vertical Video.
Custom Resolution takes any width and height from 16 to 8192 pixels. Type them and click Set.
Recordings take their sound from the Audio popover, which opens from the microphone button in the toolbar:
| Choice | What’s recorded |
|---|---|
| No Audio | Video only. |
| Camera Graph Audio Mixer | The live scene’s mix from the Mixer, in stereo at 48 kHz. |
| A microphone or interface | That device, with the Audio Channels (Mono or Stereo) and Sample Rate (44100 or 48000) set in the same popover. |
Sound is saved as AAC.
File names and where they go
Section titled “File names and where they go”Recordings go in the folder you chose, named by the date and time they started: 26-11-11_14-30-05.mp4 is a recording started on 11 November 2026 at 14:30:05.
To change the folder, open Record settings and click the folder path.
If Camera Graph quits while recording
Section titled “If Camera Graph quits while recording”Camera Graph writes recordings in one-second pieces, so a crash, a force quit or a power cut doesn’t lose the whole file.
The next time you open Camera Graph, it checks for an unfinished recording and repairs it. A notification tells you what happened:
- Recording recovered: the video was saved up to the moment Camera Graph stopped. Click the notification to show the file in the Finder.
- Recording could not be recovered: the file had no video that could be read. Camera Graph leaves it where it is.
Quitting while recording
Section titled “Quitting while recording”If you quit while recording, Camera Graph asks first. Stop Recording and Quit stops the recording, finishes the file, then quits. If you’re also streaming, one question covers both.
When you log out, restart or shut down your Mac, Camera Graph stops and saves the recording without asking.
When the disk fills up
Section titled “When the disk fills up”If the disk runs out of space, the recording stops and Camera Graph says Recording stopped: “Your disk is full, so recording stopped.” Everything recorded up to that point is kept. Free up some space, then start a new recording.
If Camera Graph is behind another app, you also get a notification.
Recording while streaming
Section titled “Recording while streaming”You can record and stream at the same time. The recording keeps your full output size, while the stream is sent at 1920×1080 at most. A 4K output records in 4K and streams in 1080p.
Stop also ends the recording
Section titled “Stop also ends the recording”Pressing Stop for the virtual camera (the toolbar button, Control › Stop, the menu bar panel or ⌥P) also stops a recording. See Virtual Camera.
Shortcuts
Section titled “Shortcuts”| Action | Shortcut |
|---|---|
| Start or stop recording | ⌘R |
| Save Instant Replay | ⌥⌘R |
⌘R works while Camera Graph is in front. To use it from other apps too, turn on Use Record and Stream shortcuts in other apps in Settings › Shortcuts. That needs a Record shortcut other than ⌘R, because browsers use ⌘R to reload. See Keyboard Shortcuts.