
Instant Replay
Instant Replay keeps the last few seconds of your output in memory. When something worth keeping happens, press ⌥⌘R and Camera Graph saves those seconds as a movie file. You don’t need to be recording.
Turn it on
Section titled “Turn it on”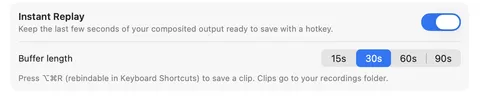
- Choose Camera Graph › Settings… (⌘,) and select Video.
- Turn on Instant Replay.
- Choose a Buffer length: 15s, 30s, 60s or 90s. The default is 30s.
While Instant Replay is buffering, a replay button appears in the toolbar, so you can always tell it’s on.
Instant Replay is off until you turn it on. The buffer stays in memory on your Mac: nothing is written to disk until you save a clip.
Save a clip
Section titled “Save a clip”Do any of these:
- Press ⌥⌘R. This works while another app is in front. To change the shortcut, see Save Instant Replay in Settings › Shortcuts.
- Click the replay button in the toolbar.
- Choose Control › Save Instant Replay.
Camera Graph saves the buffer to your recordings folder, the one set in Record settings (the arrow next to the Record button). Clips are named by the date and time they were saved, such as Replay-2026-11-11_14-30-05.mov.
A notification tells you the clip’s length and folder. Click it to show the clip in the Finder. The toolbar button shows a spinner while the clip is being written, and buffering carries on.
Shorter clips
Section titled “Shorter clips”A clip can be shorter than the buffer length:
- Right after you turn Instant Replay on, the buffer hasn’t filled yet.
- Starting or stopping a recording or a stream starts the buffer again, so a clip covers the time since then.
The notification then says “Saved the last 12s”, with the real length.
Picture and sound
Section titled “Picture and sound”Clips have the same sound as your recordings: the Mixer or the device chosen in the Audio popover (the toolbar’s microphone button).
The picture comes from whatever is already encoding your output:
| While you are | Clips match |
|---|---|
| Recording in H.264 or HEVC | The recording |
| Streaming, but not recording | The stream, which is at most 1920×1080 |
| Doing neither | Your output size |
If the replay button turns orange, your Mac can’t encode every frame at your output’s frame rate. Hold the pointer over the button to see the frame rate it’s getting. Lowering the output’s resolution or frame rate in Settings › Video helps.
Not available with ProRes
Section titled “Not available with ProRes”Instant Replay is unavailable while the recording format is ProRes 422. The setting is dimmed with “Not available when recording in ProRes.”, and ⌥⌘R does nothing. Camera Graph also switches the format to ProRes 422 when you set the frame rate above 60 fps.
Your choice is kept: switch the format back to H.264 or HEVC in Record settings and Instant Replay starts again.
If a clip isn’t saved
Section titled “If a clip isn’t saved”The notification says why:
| Message | What to do |
|---|---|
| Instant replay is off | Turn on Instant Replay in Settings › Video. |
| Nothing buffered yet. | Wait a moment after turning it on, then try again. |
| No save folder set — choose one in the toolbar’s Record settings. | Click the arrow next to the Record button and choose a Save Directory, or start a recording once and pick one. |
| Could not save the clip. | Check that the recordings folder still exists and the disk has space. |