
Canvas and Multiview
The canvas is where you see and arrange the scene you are editing. It works in three ways:
| Mode | What you see | Turn it on |
|---|---|---|
| Locked to the frame | The edited scene, fitted to the output frame. | View › Lock to Frame (⇧⌘L) |
| Unlocked | An infinite canvas around the frame. Zoom, pan, and work on layers outside the frame. | View › Unlock Canvas (⇧⌘L) |
| Multiview | Every scene as a live frame on one canvas. Edit one scene while another is live. | View › Multiview (⇧⌘M), or the Multiview button in the toolbar |
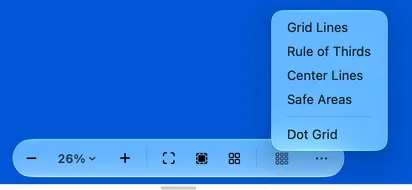
The canvas controls at the bottom of the canvas hold the same commands: the lock (with Multiview off), the zoom menu, Guides and Canvas Options. They fade out when you aren’t using them and come back when you move the pointer.
Lock and unlock the canvas
Section titled “Lock and unlock the canvas”Locked, the canvas always fits the output frame, so you see exactly what goes out. Layers outside the frame aren’t visible. When there are some, a notice says how many: click Show to unlock the canvas and zoom out to them.
Unlocked, the canvas extends in every direction. Park layers outside the frame until you need them, then drag them in. Anything outside the frame isn’t in the output.
Multiview keeps the canvas unlocked.
Zoom and pan
Section titled “Zoom and pan”| To | Do this |
|---|---|
| Pan | Scroll with two fingers, hold Space and drag, or drag with the middle mouse button. |
| Zoom | Pinch on the trackpad, or hold ⌘ and scroll. |
| Zoom in or out a step | View › Zoom In (⌘=) and Zoom Out (⌘−). |
| See pixels at their real size | View › Actual Size (⌘1). |
| Fit the output frame | View › Fit Frame (⌘0). In Multiview: Zoom to Live Scene. |
| Fit the frame and every layer | View › Fit All Layers (⇧⌘0). In Multiview: Zoom to All Scenes. |
The zoom menu in the canvas controls shows the current zoom and has the same fit commands.
Guides
Section titled “Guides”Turn guides on in View › Guides, or from Guides in the canvas controls:
| Guide | Shows |
|---|---|
| Grid Lines | Evenly spaced lines over the frame. |
| Rule of Thirds | Lines that divide the frame into thirds across and down. |
| Center Lines | A vertical and a horizontal line through the centre of the frame. |
| Safe Areas | The action-safe and title-safe rectangles inside the frame. |
| Dot Grid | Dots on the canvas around the frame. Unlocked canvas only. |
Set the guide colours and the grid size in Settings › Graph. Change the canvas colour from Canvas Options › Canvas Color… in the canvas controls, or in Settings › Graph.
The View menu also has Keep Preview on Top (see Presenting Mode), Overlays (the outlines around layers), Measurement (the measurement lines while you move a layer) and Mirror Output, which flips the output horizontally.
Arrange layers
Section titled “Arrange layers”Click a layer on the canvas to select it. Its settings appear in the inspector. In Multiview, clicking a layer also makes its scene the one you are editing.
| To | Do this |
|---|---|
| Move a layer | Drag it. While you drag, it snaps into line with the frame and other layers. Turn this off with Snap to Guides in Settings › Graph. |
| Resize a layer | Drag a handle on its outline. |
| Select several layers | ⌘-click each one. Drag any of them to move them together. |
| Nudge | ⌘ and an arrow key moves the selected layers 1 point; ⌥⌘ and an arrow moves them 5 points. The Layer menu lists these as Nudge Left, Nudge Right, Nudge Up and Nudge Down. |
| Snap to an edge or the centre | Use the Position buttons in the inspector, or ⌃⌥ and an arrow key. ⌃⌥↩ centres the layer. |
| Crop | Click the crop button in the inspector or press ⌥⌘C, drag the crop edges, then press ⌥⌘↩ or click the crop button again. |
| See distances | Hold ⌥ while pointing at a layer to see its distance to the edges of the frame. |
| Bring a layer into view | Right-click it in the sidebar and choose Reveal on Canvas. |
Locked layers can’t be dragged or nudged. To lock, hide, reorder, rename or delete layers, see Work with layers.
The canvas context menu
Section titled “The canvas context menu”Right-click a layer on the canvas:
| Item | What it does |
|---|---|
| Display Layer | Shows or hides the layer. |
| Lock Layer, Unlock Layer | Locks the layer in place, or frees it. With several layers selected: Lock N Layers. |
| Delete | Deletes the layer. |
| Duplicate | Adds a copy of the layer. |
| Crop | Starts cropping. Camera, Screen Share, Browser, Video and Image layers. |
| Snap To | Snap Center, Snap Top, Snap Bottom, Snap Left or Snap Right. |
| Layer Ordering | Bring to Front, Bring Forward, Send Backward or Send to Back, the same as the Layer menu. |
| Reveal on Canvas | Zooms so the layer and the output frame are both in view. |
| Expand to fill | Sizes the layer to the output frame and centres it. Shape, Browser and Text layers. |
| Aspect Ratio | Locks or unlocks the layer’s aspect ratio. Camera, Screen Share and Image layers. |
Keyboard on the canvas
Section titled “Keyboard on the canvas”Click the canvas, press Tab to reach it, or choose View › Move Focus to Canvas (⌥⌘0). While the canvas has focus:
| Key | What it does |
|---|---|
| Arrow keys | Move the selected layers 1 point. In Multiview with frames selected, move the frames. |
| ⇧ and an arrow key | Move them 5 points. |
] and [ |
Select the next or previous layer. |
| Delete | Delete the selected layers. |
| Escape | Clear the selection. |
| ⌘A | Select every frame (Multiview). |
Common layer settings
Section titled “Common layer settings”Most layer inspectors end with the same settings. Each layer’s page lists which ones it has.
| Setting | Description |
|---|---|
| Opacity | How transparent the layer is, from 0 to 1. |
| Scale | Scales the layer, from 0.1 to 4. Off while the layer is cropped. |
| Transform | W and H set the size in pixels. Lock Aspect Ratio keeps the proportions; with it on, the switch beside it chooses whether you type the width or the height. Expand to fill sizes the layer to the output frame. X and Y set the position. A line under it says whether the layer is inside, partly outside or outside the frame. |
| Position | Snap Top, Snap Bottom, Snap Left, Snap Right and Snap Center move the layer to that edge or the centre of the frame. |
| Crop | Starts and finishes cropping. A checkmark shows the layer is cropped, and Delete Crop removes the crop. |
| Rotation Angle | Drag the dial to rotate the layer. Reset Rotation sets it back to 0°. |
You can map a layer’s Opacity and Scale to a MIDI fader or knob. See MIDI.
Multiview
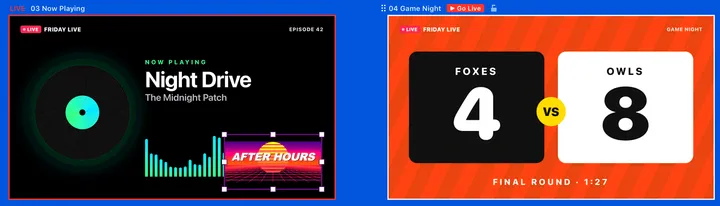
Section titled “Multiview”Multiview puts every scene on the canvas as a frame, with its layers running. You can change any scene while another one is live, then put it on air when it’s ready.
Turn Multiview on with the Multiview button in the toolbar or View › Multiview (⇧⌘M).
Edit off air, then go live
Section titled “Edit off air, then go live”With Multiview on, two scenes matter:
- The live scene is the one going out. The sidebar marks it LIVE.
- The edited scene is the one you are changing. Click a scene in the sidebar, or click its frame or one of its layers on the canvas, to edit it. The output doesn’t change.
To put the edited scene live, click ▶ Go Live on its frame label, or press ⌘↩. You can also double-click a scene’s frame label or its row in the sidebar, or right-click the row and choose Go Live. Its transition plays as it goes live.
Arrange frames
Section titled “Arrange frames”| To | Do this |
|---|---|
| Move a frame | Drag its label. Frames can’t overlap. |
| Select several frames | ⇧-click their labels, or hold ⇧ and drag across empty canvas. Then drag one label to move them all. |
| Lock a frame in place | Click the lock on its label, right-click the label and choose Lock Position, or turn on Lock Position in the scene’s inspector. With frames selected, Layer › Lock Frame Positions (⌥⌘L) locks them all. |
| Tidy them into a grid | Click Tidy Up in the canvas controls, or choose View › Tidy Up Scenes (⇧⌥⌘T). Shown frames line up in a grid that starts at the live scene. Locked frames stay where they are. A notice with Undo says how many moved. |
| Bring a scene’s frame to you | Right-click the scene in the sidebar and choose Move Here. |
Scene › Frames has the same frame commands: Select All Frames, Move Here, Hide Scenes and Lock Position. With no frame selected, they act on the edited scene.
Hide scenes from the canvas
Section titled “Hide scenes from the canvas”Each scene that’s on the canvas keeps running. To save resources, hide the scenes you don’t need right now: point at a scene in the sidebar and click its eye button (Hide on Canvas). Click it again to Show on Canvas. The live scene always stays on the canvas. When more than six scenes are shown, a notice suggests hiding some.
Move or copy layers between scenes
Section titled “Move or copy layers between scenes”In Multiview, drag a layer from one frame onto another scene’s frame. A badge next to the pointer says what will happen:
| Badge | What happens when you let go |
|---|---|
| Move to scene | The layer moves into that scene. |
| Copy to scene | Hold ⌥: a copy goes into that scene and the original stays. |
| Duplicate | Hold ⌥ over the layer’s own frame or empty canvas: a copy goes into its own scene. |
A notice with Undo confirms the move. Cameras and screen shares keep running while they move, with no restart. While you are recording or streaming, the badge adds LIVE when the drop changes what is on air.
Shortcuts
Section titled “Shortcuts”| Name | Keyboard Controls |
|---|---|
| Multiview | ⇧⌘M |
| Unlock Canvas / Lock to Frame | ⇧⌘L |
| Zoom In / Zoom Out | ⌘= / ⌘− |
| Actual Size | ⌘1 |
| Fit Frame (Zoom to Live Scene in Multiview) | ⌘0 |
| Fit All Layers (Zoom to All Scenes in Multiview) | ⇧⌘0 |
| Tidy Up Scenes | ⇧⌥⌘T |
| Go Live with Edited Scene | ⌘↩ |
| Move Focus to Canvas | ⌥⌘0 |
| Nudge 1 point / 5 points | ⌘ arrow / ⌥⌘ arrow |
| Snap to edge / centre | ⌃⌥ arrow / ⌃⌥↩ |
| Crop / Exit Crop | ⌥⌘C / ⌥⌘↩ |
| Lock Layer or Frame Positions | ⌥⌘L |
| Pan | Space-drag |
See Keyboard Shortcuts for the full list.