
Mixer
The mixer combines your scene’s sound sources into one mix for recordings, streams and Instant Replay. Every scene has its own mixer, so each scene can have its own sources and levels. The virtual camera carries video only; apps that use it take sound from their own microphone setting.
Turn the mixer on
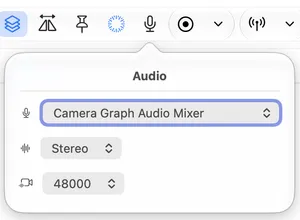
Section titled “Turn the mixer on”- Click the microphone button in the toolbar. The Audio popover opens.
- Set the device to Camera Graph Audio Mixer.
If you pick a single microphone instead, recordings and streams use that microphone alone and the mixer stops. The mixer’s Master strip then shows a yellow warning: “Select “Camera Graph Audio Mixer” in audio settings to enable the mixer.”
| Setting | Options |
|---|---|
| Device | No Audio, Camera Graph Audio Mixer, or any microphone on your Mac. |
| Audio Channels | Mono or Stereo. |
| Sample Rate | 44100 or 48000. |
| Stop Audio | Stops the microphone. Shown while it is running. |
A mono microphone comes through at its full level in both channels of a stereo mix.
While you are streaming these settings are locked, with the note “Stop the broadcast to change this.” If Camera Graph doesn’t have microphone access yet, the popover shows Click here to enable microphone access. See Install and Permissions.
Open the mixer
Section titled “Open the mixer”Click the Audio tab in the drawer under the preview. Press ⇧⌘Y to show or hide the drawer. The tab shows how many tracks the scene has, for example “Audio 3”.
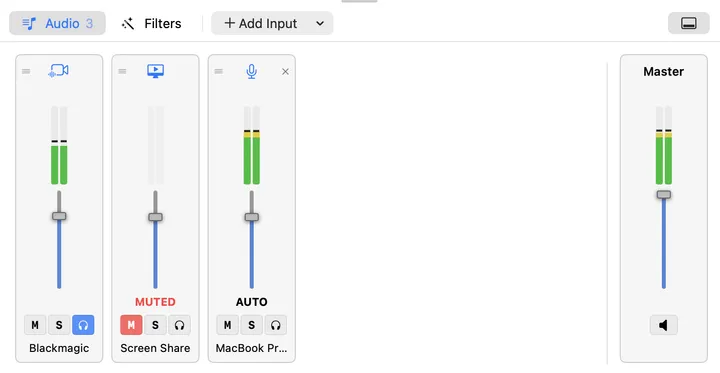
The drawer shows the mixer of the scene you are editing. That is the live scene, unless Multiview is on and you are editing another scene. See Canvas and Multiview.
Add sources
Section titled “Add sources”| Source | How it gets a track |
|---|---|
| Video | Automatically, when you add the layer to the scene. |
| Screen Share | Automatically. |
| Blackmagic | Automatically. All eight embedded audio channels are captured and folded to stereo: front left and right as they are, center, LFE and surrounds mixed in 3 dB lower. A stereo source passes through unchanged. |
| Microphones and other audio inputs | Click Add Input in the drawer’s tab bar and choose a device. Inputs already in this scene are checked. |
Add to All Scenes, at the bottom of the Add Input menu, is on unless you turn it off. While it is on, an input you add goes into every scene’s mixer, so your microphone stays on air when you cut. Scenes that already have it keep their track as it is. Each scene’s track is its own, with its own fader and buttons, and × removes it from that scene only. Turn Add to All Scenes off to add an input to the scene you are editing only.
When you cut between two scenes that both have the same microphone, it carries across the cut without a gap.
Browser layers are not mixer tracks. A page’s sound plays on your Mac while its scene is live and is muted while it is off air.
Channel strips
Section titled “Channel strips”Each track is a strip, with the Master strip on the right.
| Control | What it does |
|---|---|
| Handle (top left) | Drag the strip left or right to reorder. VoiceOver offers Move Up and Move Down. |
| × (top right) | Removes a microphone or input track. |
| CLIP | Lights when the track reaches full scale and stays lit until you click it. |
| Meter | Left and right levels, green to yellow to red, with a peak line that falls back after about two seconds. |
| Fader | The track’s volume, on a decibel scale. The line three quarters of the way up is 0 dB, the source’s own level. Above it the fader boosts up to +12 dB for a quiet microphone; at the bottom the track is off. VoiceOver reads the level in dB and steps 1 dB at a time. |
| M Mute | Takes the track out of the mix. The strip reads MUTED. |
| S Solo | Sends only soloed tracks to the output. The strip reads SOLO, and the other strips’ meters dim. Solo doesn’t change what you monitor. |
| Headphones | Monitor: plays the track through your Mac’s speakers or headphones. |
| Name | The layer’s or device’s name. |
The Master strip has the mix meter, the master fader and a mute button that mutes or unmutes every track at once. The master fader runs from off at the bottom to full level at the top, with no boost.
Auto Level
Section titled “Auto Level”Right-click a microphone or input strip and choose Auto Level to keep a voice at a steady level, the way call apps do. It raises a quiet voice and lowers a loud one, and holds still in pauses so room noise isn’t raised. It boosts up to 24 dB and cuts up to 12 dB, and keeps peaks just under full scale. The strip reads AUTO while it is on, unless it is muted or soloed. You hear the leveled sound when you monitor the track too.
Auto Level is off until you turn it on, and is set per track. It is only offered on microphone and input tracks.
Fader moves, mute, solo, monitor, Auto Level, reordering and removing a track can all be undone with ⌘Z.
Each strip’s fader, M, S and headphones, and the Master fader and mute, can be mapped to a MIDI controller with MIDI Map Mode or Settings › MIDI. See MIDI.
A mixer mapping follows the source, not one scene. A microphone’s mapping works its track in whichever scene is live; a layer’s mapping works the track of a layer with the same type and name. If the live scene has no such track, the control does nothing. The Master mappings work the live scene’s Master strip.
A mapped fader moves the strip’s fader along its dB scale. When the hardware fader doesn’t match the strip, the strip shows an arrow until you move the hardware fader to the strip’s level and pick it up. Auto Level has no MIDI mapping.
On air and in your ears
Section titled “On air and in your ears”The mix that goes on air and what you hear on your Mac are separate.
| On air (recording, streams, Instant Replay) | Your speakers or headphones | |
|---|---|---|
| Which tracks | Every track that isn’t muted, or only the soloed ones while any track is soloed | Only tracks with Monitor on |
| Track fader | Applies | Applies |
| Mute, on a track or the Master strip | Silences the track | Silences the track |
| Solo | Applies | No effect |
| Master fader | Applies | No effect |
When the mixer is on, a video layer’s sound plays on your Mac only while its monitor is on. A shared window’s app still plays its own sound as usual, so monitoring a screen share track can make you hear it twice.
Only the live scene’s mixer is on air. You can set up another scene’s tracks and faders while it is off air; they take effect when it goes live. With Multiview on, changing the mixer of a scene you are editing beside the live one never changes what is on air. Meters move only for the live scene.
Menu bar meter
Section titled “Menu bar meter”The Camera Graph menu bar panel has a Master meter that shows the live mix level, so you can check your sound while the main window is hidden. See Menu Bar.
- My recording has no sound.
Check that the toolbar’s Audio popover is set to Camera Graph Audio Mixer, that the live scene has tracks, and that they aren’t muted or turned all the way down. A solo on one track silences the rest.
- Why can’t I hear my video layer?
With the mixer on, a video’s sound reaches your speakers only through Monitor. Click the headphones on its strip.
- Why is the mixer empty?
The scene has no video, screen share or Blackmagic layer, and no input has been added. The drawer says “No audio sources. Add a video, screen share or Blackmagic layer to this scene, or add an input.” Click Add Input to add a microphone.
Shortcuts
Section titled “Shortcuts”| Name | Keyboard Controls |
|---|---|
| Show or Hide Drawer | ⇧⌘Y |
| Undo | ⌘Z |